Load - Operations
Setting up a new Load is done in three steps using the Load Creation controls:
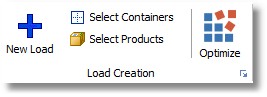
1. Click on the '+' icon on the Load Setup icon bar, or use the Loads / New Load button in the FILE tab. Enter a name/ID for the Load. This can be up to 64 characters in length, and must uniquely identify the current Load.

2. Add Container(s) into the Stage 1 and set the fields accordingly.
![]()
3. Select Products into the Load List, and set the quantities to be loaded.
![]()
Now setup is complete with the Container List and the Load List in place. Use (4. ) the Optimize button to get the Load optimized.

5. Finally you can inspect the Load Plan,

6. Print it, and print the Loading Manifest.
Click here for more information on the Load Setup Window.
Before you can do these steps the following data must be in place:
(a) the Containers (that is, what we are loading into, for example shipping Containers, trucks, ULDs, pallets, crates, totes, or boxes)
(b) the Products (that is, what we are loading: SKUs, boxes, cartons, articles, items, rolls).
Accessing, editing and viewing the Load details can all be accessed through the Main Menu tabs.
![]()
Loads Setup - opens the Load Setup Window, with all data fields empty. Start typing the name of the new Load.
Load Plan - opens the 3D Load Diagram (Graphics) screen.
Load Edit - opens a screen in which you can use interactive drag&drop to modify a Load Plan. (2D Load Edit is a special Load Edit variant for the loading of lumber.)
Load Overview - at-a-glance view of all loaded containers.